点击阅读更多查看文章内容
JavaWeb实现简单的用户注册登录
代码主要参考的以下博客,我自己修改了一些,可以让刚入门的同学(我自己)更好的理解。
https://blog.csdn.net/caojianhua2018/article/details/92412453
项目结构
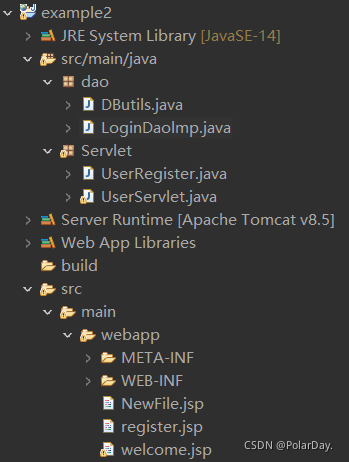
dao:这个包下主要是一些关于数据库的操作
dao.DButils:数据库的创建和删除
dao.LoginDaolmp:数据库与用户的交互操作,包括检验用户登录的账号是否合法,当用户注册时将账号插入数据库。
Servlet:实现javaweb的前后端交互
UserRegister:用户注册,当注册新用户时会跳转到此,实现将新用户的账号密码插入数据库中。
UserServlet:用户登录,当用户登录账号时会跳转到此,实现对用户账号密码的合法性检验。
Servlet(Server Applet),全称Java Servlet,未有中文译文。是用Java编写的服务器端程序。其主要功能在于交互式地浏览和修改数据,生成动态Web内容。狭义的Servlet是指Java语言实现的一个接口,广义的Servlet是指任何实现了这个Servlet接口的类,一般情况下,人们将Servlet理解为后者。
NewFile:登录页面
register:注册页面
welcome:登陆成功页面
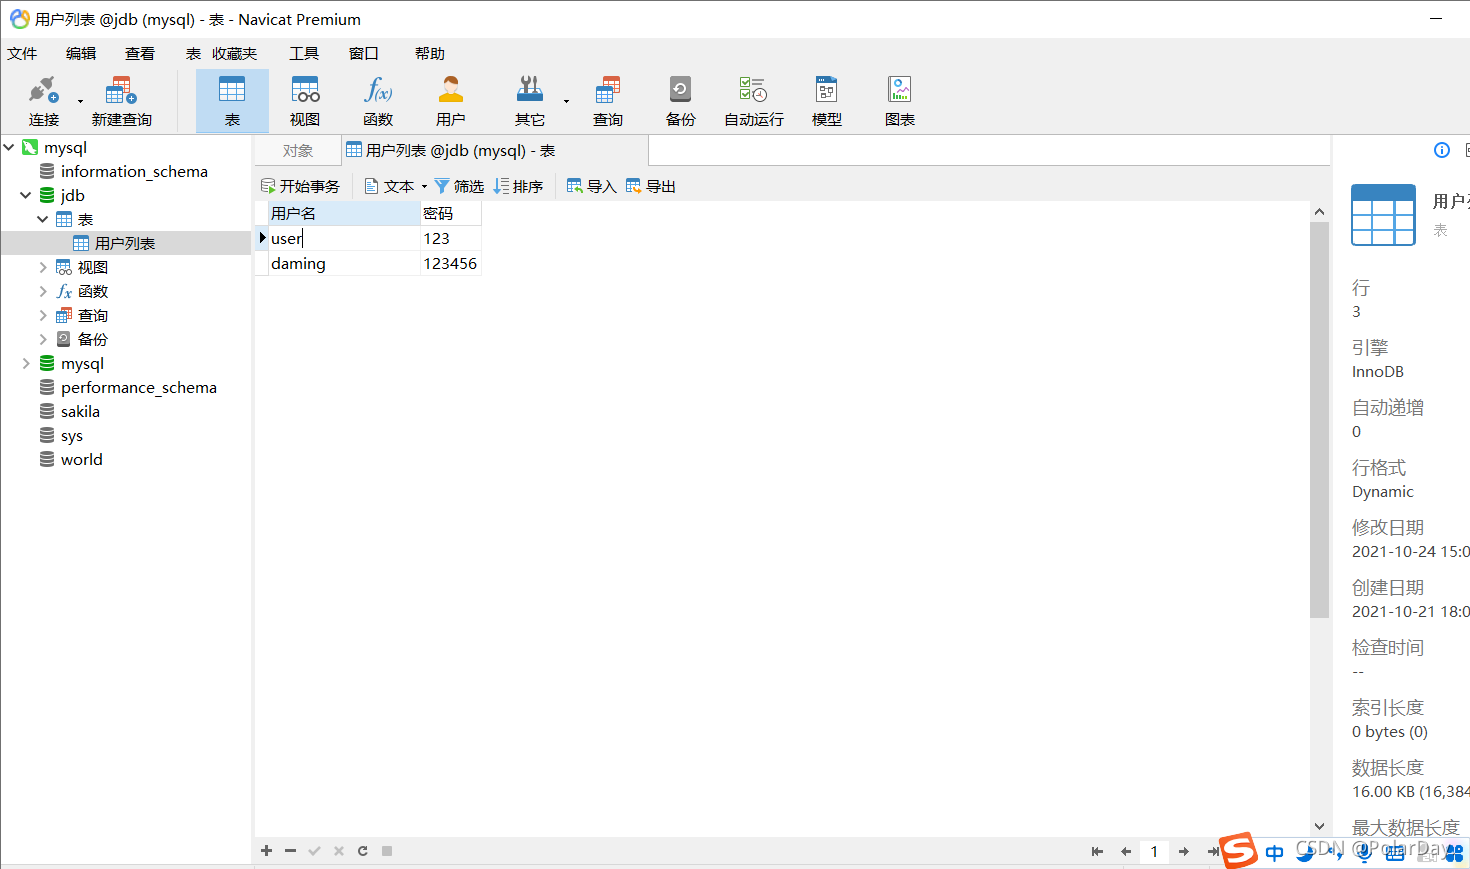
初始数据库
这里我用的可视化工具是Navicat
前端页面设计
登录界面:
1
2
3
4
5
6
7
8
9
10
11
12
13
14
15
16
17
18
19
20
21
22
23
24
25
26
27
28
29
30
31
| <%@ page language="java" contentType="text/html; charset=UTF-8"
pageEncoding="UTF-8"%>
<!DOCTYPE html>
<html>
<head>
<script>
function zhuce(){
document.login.action="register.jsp";
document.login.submit();
}
</script>
<meta charset="UTF-8">
<title>登录页面</title>
</head>
<body>
<form id="form1" name="login" action="UserServlet" method="post" >
用户:<input name="username" type="text">
<br>
<br>
密码:<input name="userpwd" type="password">
<br>
<br>
<input type="submit" value="提交查询" >
<input type="button" value="注册用户" onclick=zhuce()>
</form>
</body>
</html>
|
这个页面有两个按钮,一个是提交按钮,点击后转入UserServlet执行,一个是注册按钮,点击后转到注册页面。
注册界面:
1
2
3
4
5
6
7
8
9
10
11
12
13
14
15
16
| <%@ page language="java" contentType="text/html;charset=UTF-8"
pageEncoding="UTF-8"%>
<!DOCTYPE html>
<html>
<head>
<meta charset="UTF-8">
<title>注册页面</title>
</head>
<body>
<form id="form1" action="UserRegister" method="post">
用户名:<input name="username" type="text">
密码:<input name="userpwd" type="password">
<input value="注册" type="submit" name="submit">
</form>
</body>
</html>
|
本页面只有一个注册按钮,点击后转入UserRegister执行。
登陆成功界面:
1
2
3
4
5
6
7
8
9
10
11
12
13
14
15
16
17
18
19
20
21
22
| <%@ page language="java" contentType="text/html; charset=UTF-8"
pageEncoding="UTF-8"%>
<!DOCTYPE html>
<html>
<head>
<meta charset="UTF-8">
<title>欢迎页面</title>
</head>
<body>
<% if(session.getAttribute("check")!=null)
{%>
欢迎 < <%=session.getAttribute("username") %> >
<% }
else
{%>
<jsp:forward page="NewFile.jsp"></jsp:forward>
<% }%>
</body>
</html>
|
登陆成功后转入本页面,其中username保存的是登陆时的用户名,check用于检查是否是由登录页面转来,如果是直接运行的此页面则会跳转至登录页面。
Dao数据访问对象
DButils.java
1
2
3
4
5
6
7
8
9
10
11
12
13
14
15
16
17
18
19
20
21
22
23
24
25
26
27
28
29
30
31
32
| package dao;
import java.sql.*;
public class DButils {
static final String JDBC_DRIVER="com.mysql.jdbc.Driver";
static final String DB_URL="jdbc:mysql://127.0.0.1:3306/jdb?user=xxxx&password=xxxx&useUnicode=true&characterEncoding=UTF-8&useSSL=true";
static Connection conn=null;
public static Connection getConnection() {
try {
Class.forName(JDBC_DRIVER);
conn=DriverManager.getConnection(DB_URL);
System.out.println("连接成功");
}catch(Exception e) {
e.printStackTrace();
}
return conn;
}
public static void Close() {
try {
if(conn!=null) {
conn.close();
}
}catch(SQLException e) {
e.printStackTrace();
}
}
}
|
此类实现数据库连接的建立和关闭,其中DB_URL是你数据库的url地址

这里把jdb改成你自己数据库的名字,user和password分别是你创新数据库时使用的用户名和密码,其他的不需要改,具体的使用方法可以自己搜一下。
LoginDaolmp.java
1
2
3
4
5
6
7
8
9
10
11
12
13
14
15
16
17
18
19
20
21
22
23
24
25
26
27
28
29
30
31
32
33
34
35
36
37
38
39
40
41
42
43
44
45
| package dao;
import java.sql.*;
public class LoginDaolmp {
public boolean searchName(String loginName,String loginpwd) {
Connection conn=DButils.getConnection();
String sql="select * from 用户列表 where 用户名=? and 密码=?";
try {
PreparedStatement ps=conn.prepareStatement(sql);
ps.setString(1, loginName);
ps.setString(2, loginpwd);
ResultSet rs=ps.executeQuery();
while(rs.next()) {
return true;
}
}catch(SQLException e) {
e.printStackTrace();
}
return false;
}
public boolean RegisterName(String loginName,String loginpwd)
{
Connection conn=DButils.getConnection();
PreparedStatement ps=null;
String sql="insert into 用户列表 values(?,?)";
try {
ps=conn.prepareStatement(sql);
ps.setString(1, loginName);
ps.setString(2, loginpwd);
int result=ps.executeUpdate();
if(result==1) {
return true;
}
}catch(SQLException e) {
e.printStackTrace();
}
return false;
}
}
|
searchName方法实现对登录用户的合法性检验,注意这里要用PreparedStatement实现动态的检查

这里的具体参数可以对照着上面的数据库看,不再赘述,有不懂的可以私信我。
RegisterName同理实现的是对注册用户信息的插入。
Servlet容器接收响应处理
这是本实验最麻烦的地方,如果大家不知道servlet的话可以先简单的了解一下servlet再看本代码
下面代码有许多冗余注释,不需要看
这里注意创建文件的时候可以直接创建Servlet

UserRegister
1
2
3
4
5
6
7
8
9
10
11
12
13
14
15
16
17
18
19
20
21
22
23
24
25
26
27
28
29
30
31
32
33
34
35
36
37
38
39
40
41
42
43
44
45
46
47
48
49
50
51
52
53
54
55
56
57
58
59
60
| package Servlet;
import java.io.IOException;
import java.io.PrintWriter;
import javax.servlet.ServletException;
import javax.servlet.annotation.WebServlet;
import javax.servlet.http.HttpServlet;
import javax.servlet.http.HttpServletRequest;
import javax.servlet.http.HttpServletResponse;
import dao.LoginDaolmp;
@WebServlet("/UserRegiste")
public class UserRegister extends HttpServlet {
private static final long serialVersionUID = 1L;
public UserRegister() {
super();
}
protected void doGet(HttpServletRequest request, HttpServletResponse response) throws ServletException, IOException {
response.getWriter().append("Served at: ").append(request.getContextPath());
}
protected void doPost(HttpServletRequest request, HttpServletResponse response) throws ServletException, IOException {
response.setCharacterEncoding("utf-8");
response.setContentType("text/html;charset=utf-8");
String username=request.getParameter("username");
String userpwd=request.getParameter("userpwd");
LoginDaolmp dl=new LoginDaolmp();
PrintWriter out=response.getWriter();
boolean isHave=dl.RegisterName(username, userpwd);
if(isHave) {
out.println("<script>alert('RegisterSucceed');window.location.href='NewFile.jsp'</script>");
}else {
out.println("<script>alert('RegisterFailed');window.location.href='NewFile.jsp'</script>");
}
}
}
|
UserServlet
1
2
3
4
5
6
7
8
9
10
11
12
13
14
15
16
17
18
19
20
21
22
23
24
25
26
27
28
29
30
31
32
33
34
35
36
37
38
39
40
41
42
43
44
45
46
47
48
49
50
51
52
53
54
55
56
57
58
59
60
61
62
63
64
65
66
67
68
69
70
71
| package Servlet;
import java.io.IOException;
import java.io.PrintWriter;
import javax.security.auth.message.callback.PrivateKeyCallback.Request;
import javax.servlet.ServletException;
import javax.servlet.annotation.WebServlet;
import javax.servlet.http.HttpServlet;
import javax.servlet.http.HttpServletRequest;
import javax.servlet.http.HttpServletResponse;
import com.mysql.cj.Session;
import dao.LoginDaolmp;
@WebServlet("/UserServlet")
public class UserServlet extends HttpServlet {
private static final long serialVersionUID = 1L;
public UserServlet() {
super();
}
protected void doGet(HttpServletRequest request, HttpServletResponse response) throws ServletException, IOException {
response.getWriter().append("Served at: ").append(request.getContextPath());
}
protected void doPost(HttpServletRequest request, HttpServletResponse response) throws ServletException, IOException {
doGet(request,response);
String username=request.getParameter("username");
String userpwd=request.getParameter("userpwd");
LoginDaolmp dl=new LoginDaolmp();
boolean isHave=dl.searchName(username, userpwd);
if(isHave) {
request.setCharacterEncoding("UTF-8");
response.setCharacterEncoding("UTF-8");
request.setAttribute("username", username);
request.setAttribute("check", 1);
request.getSession().setAttribute("username", username);
request.getSession().setAttribute("check", 1);
response.setContentType("text/html;charset=UTF-8");
PrintWriter out=response.getWriter();
out.println("<script>alert('LoginSucceed');window.location.href='welcome.jsp'</script>");
}else {
request.setCharacterEncoding("UTF-8");
response.setCharacterEncoding("UTF-8");
request.getSession().setAttribute("info","account does not right");
PrintWriter out=response.getWriter();
response.setContentType("text/html;charset=UTF-8");
out.println("<script>alert('LoginFailed');window.location.href='NewFile.jsp'</script>");
}
}
}
|
XML文件的配置
注意一定要配置XML文件不然会报404,,如果你在创建文件的时候没有生成xml文件可以通过以下方法自动生成
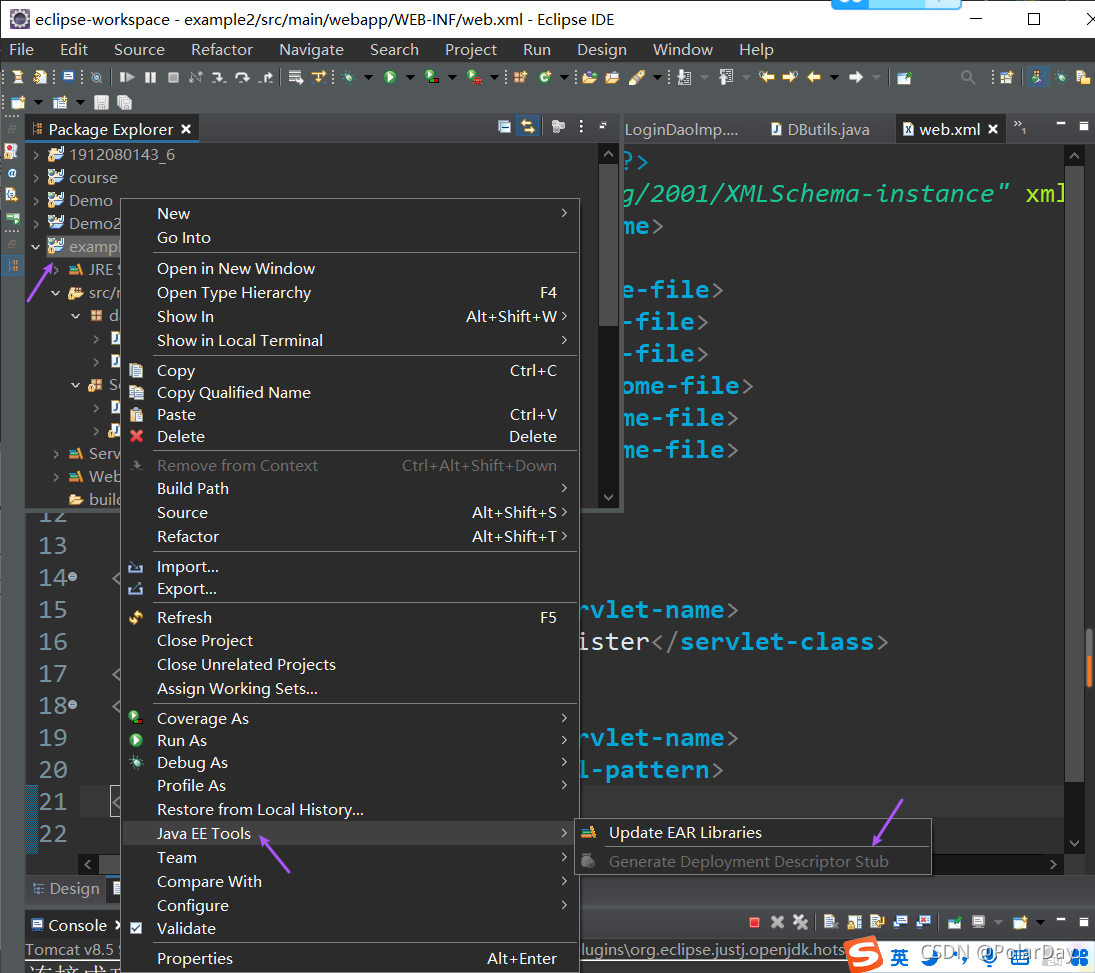
我这里已经有了所以是灰色的,注意xml文件,要放在WEB-INF下
具体配置如下
1
2
3
4
5
6
7
8
9
10
11
12
13
14
15
16
17
18
19
20
21
22
23
24
| <?xml version="1.0" encoding="UTF-8"?>
<web-app xmlns:xsi="http://www.w3.org/2001/XMLSchema-instance" xmlns="http://xmlns.jcp.org/xml/ns/javaee" xsi:schemaLocation="http://xmlns.jcp.org/xml/ns/javaee http://xmlns.jcp.org/xml/ns/javaee/web-app_3_1.xsd" version="3.1">
<display-name>example2</display-name>
<welcome-file-list>
<welcome-file>index.html</welcome-file>
<welcome-file>index.htm</welcome-file>
<welcome-file>index.jsp</welcome-file>
<welcome-file>default.html</welcome-file>
<welcome-file>default.htm</welcome-file>
<welcome-file>default.jsp</welcome-file>
</welcome-file-list>
<servlet>
<servlet-name>UserRegister</servlet-name>
<servlet-class>Servlet.UserRegister</servlet-class>
</servlet>
<servlet-mapping>
<servlet-name>UserRegister</servlet-name>
<url-pattern>/UserRegister</url-pattern>
</servlet-mapping>
</web-app>
|
结语
完成以上步骤就可以实现用户登录注册了,这里面只有最简单的实现,没有任何多余页面的设计,看起来比较容易,但是因为笔者能力有限,这些代码远远算不上优美,以上代码尚且存在许多问题,比如中文乱码等等,如果有大佬可以解决,还请不吝赐教。
这篇文章有许多东西也还没有讲到(因为我也不会),比如xml文档为何如此配置等等,大家可以自己再去查一下有关的资料。
如果你按照以上步骤走下来仍然存在问题,欢迎私信我或在评论区留言。
希望这篇文章能帮助到你。